既存アプリとの統合
React Native は、新しいモバイルアプリをゼロから開発する場合に非常に優れています。しかし、既存のネイティブアプリケーションに単一のビューやユーザーフローを追加する場合にもうまく機能します。いくつかの手順を踏むだけで、新しい React Native ベースの機能、画面、ビューなどを追加できます。
具体的な手順は、ターゲットとするプラットフォームによって異なります。
- Android (Java & Kotlin)
- iOS (Objective-C と Swift)
主要な概念
React Native コンポーネントを Android アプリケーションに統合するための鍵は、次のとおりです。
- 正しいディレクトリ構造を設定する。
- 必要な NPM 依存関係をインストールする。
- Gradle 設定に React Native を追加する。
- 最初の React Native 画面の TypeScript コードを記述する。
- ReactActivity を使用して React Native を Android コードと統合する。
- バンドラーを実行し、アプリの動作を確認して統合をテストする。
コミュニティテンプレートの使用
このガイドに従う間、React Native Community Template を参考にすることをお勧めします。このテンプレートには最小限の Android アプリが含まれており、既存の Android アプリに React Native を統合する方法を理解するのに役立ちます。
前提条件
開発環境のセットアップとフレームワークなしで React Native を使用するガイドに従って、Android 用の React Native アプリをビルドするための開発環境を設定してください。このガイドでは、Activity の作成や `AndroidManifest.xml` ファイルの編集など、Android 開発の基本に精通していることを前提としています。
1. ディレクトリ構造の設定
スムーズな体験を確実にするために、統合された React Native プロジェクト用に新しいフォルダーを作成し、既存の Android プロジェクトを `/android` サブフォルダーに移動してください。
2. NPM 依存関係のインストール
ルートディレクトリに移動し、次のコマンドを実行します
curl -O https://raw.githubusercontent.com/react-native-community/template/refs/heads/0.82-stable/template/package.json
これにより、コミュニティテンプレートの `package.json` ファイルがプロジェクトにコピーされます。
次に、次のコマンドを実行して NPM パッケージをインストールします。
- npm
- Yarn
npm install
yarn install
インストールプロセスにより、新しい `node_modules` フォルダーが作成されました。このフォルダーには、プロジェクトのビルドに必要なすべての JavaScript 依存関係が保存されます。
`.gitignore` ファイルに `node_modules/` を追加します(コミュニティのデフォルトはこちら)。
3. アプリへの React Native の追加
Gradle の設定
React Native は、React Native Gradle Plugin を使用して依存関係とプロジェクト設定を構成します。
まず、コミュニティテンプレートで推奨されているように、次の行を追加して `settings.gradle` ファイルを編集しましょう。
// Configures the React Native Gradle Settings plugin used for autolinking
pluginManagement { includeBuild("../node_modules/@react-native/gradle-plugin") }
plugins { id("com.facebook.react.settings") }
extensions.configure(com.facebook.react.ReactSettingsExtension){ ex -> ex.autolinkLibrariesFromCommand() }
// If using .gradle.kts files:
// extensions.configure<com.facebook.react.ReactSettingsExtension> { autolinkLibrariesFromCommand() }
includeBuild("../node_modules/@react-native/gradle-plugin")

// Include your existing Gradle modules here.
// include(":app")
次に、トップレベルの `build.gradle` を開き、この行を含める必要があります (コミュニティテンプレートで推奨されているように)。
buildscript {
    repositories {
        google()
        mavenCentral()
    }
    dependencies {
        classpath("com.android.tools.build:gradle:7.3.1")
+       classpath("com.facebook.react:react-native-gradle-plugin")
    }
}
これにより、React Native Gradle Plugin (RNGP) がプロジェクト内で利用できるようになります。最後に、これらの行をアプリケーションの `build.gradle` ファイルに追加します (通常は `app` フォルダー内にある別の `build.gradle` ファイルです。参照としてコミュニティテンプレートファイルを使用できます)。
apply plugin: "com.android.application"
+apply plugin: "com.facebook.react"

repositories {
    mavenCentral()
}

dependencies {
    // Other dependencies here
+   // Note: we intentionally don't specify the version number here as RNGP will take care of it.
+   // If you don't use the RNGP, you'll have to specify version manually.
+   implementation("com.facebook.react:react-android")
+   implementation("com.facebook.react:hermes-android")
}

+react {
+   // Needed to enable Autolinking - https://github.com/react-native-community/cli/blob/master/docs/autolinking.md
+   autolinkLibrariesWithApp()
+}
最後に、アプリケーションの `gradle.properties` ファイルを開き、次の行を追加します(参照としてコミュニティテンプレートファイルはこちら)。
+reactNativeArchitectures=armeabi-v7a,arm64-v8a,x86,x86_64
+newArchEnabled=true
+hermesEnabled=true
マニフェストの設定
まず、`AndroidManifest.xml` に Internet 権限があることを確認してください。
<manifest xmlns:android="http://schemas.android.com/apk/res/android">

+   <uses-permission android:name="android.permission.INTERNET" />

    <application
      android:name=".MainApplication">
    </application>
</manifest>
次に、デバッグ `AndroidManifest.xml` でクリアテキストトラフィックを有効にする必要があります。
<?xml version="1.0" encoding="utf-8"?>
<manifest xmlns:android="http://schemas.android.com/apk/res/android"
    xmlns:tools="http://schemas.android.com/tools">

    <application
+       android:usesCleartextTraffic="true"
+       tools:targetApi="28"
    />
</manifest>
いつものように、参照として使用するコミュニティテンプレートの AndroidManifest.xml ファイルはこちらです: main および debug。
これは、アプリケーションがローカルのバンドラーである Metro と HTTP 経由で通信するため必要です。
これをデバッグマニフェストにのみ追加するようにしてください。
4. TypeScript コードの記述
次に、React Native を統合するためにネイティブ Android アプリケーションを実際に変更します。
最初に書くコードは、アプリケーションに統合される新しい画面のための実際の React Native コードです。
`index.js` ファイルを作成する
まず、React Native プロジェクトのルートに空の `index.js` ファイルを作成します。
`index.js` は React Native アプリケーションのエントリポイントであり、常に必要です。これは、React Native コンポーネントまたはアプリケーションの一部である他のファイルを `import` する小さなファイルでも、それらに必要なすべてのコードを含むファイルでも構いません。
`index.js` は次のようになるはずです(参照としてコミュニティテンプレートファイルはこちら)。
import {AppRegistry} from 'react-native';
import App from './App';

AppRegistry.registerComponent('HelloWorld', () => App);
`App.tsx` ファイルを作成する
`App.tsx` ファイルを作成しましょう。これは、TypeScript ファイルであり、JSX 式を持つことができます。Android アプリケーションに統合するルート React Native コンポーネントを含んでいます (リンク)。
import React from 'react';
import {
  SafeAreaView,
  ScrollView,
  StatusBar,
  StyleSheet,
  Text,
  useColorScheme,
  View,
} from 'react-native';

import {
  Colors,
  DebugInstructions,
  Header,
  ReloadInstructions,
} from 'react-native/Libraries/NewAppScreen';

function App(): React.JSX.Element {
  const isDarkMode = useColorScheme() === 'dark';

  const backgroundStyle = {
    backgroundColor: isDarkMode ? Colors.darker : Colors.lighter,
  };

  return (
    <SafeAreaView style={backgroundStyle}>
      <StatusBar
        barStyle={isDarkMode ? 'light-content' : 'dark-content'}
        backgroundColor={backgroundStyle.backgroundColor}
      />
      <ScrollView
        contentInsetAdjustmentBehavior="automatic"
        style={backgroundStyle}>
        <Header />
        <View
          style={{
            backgroundColor: isDarkMode
              ? Colors.black
              : Colors.white,
            padding: 24,
          }}>
          <Text style={styles.title}>Step One</Text>
          <Text>
            Edit <Text style={styles.bold}>App.tsx</Text> to
            change this screen and see your edits.
          </Text>
          <Text style={styles.title}>See your changes</Text>
          <ReloadInstructions />
          <Text style={styles.title}>Debug</Text>
          <DebugInstructions />
        </View>
      </ScrollView>
    </SafeAreaView>
  );
}

const styles = StyleSheet.create({
  title: {
    fontSize: 24,
    fontWeight: '600',
  },
  bold: {
    fontWeight: '700',
  },
});

export default App;
参照としてコミュニティテンプレートファイルはこちらです。
5. Android コードとの統合
React Native ランタイムを起動し、React コンポーネントをレンダリングするように指示するために、いくつかのネイティブコードを追加する必要があります。
アプリケーションクラスの更新
まず、`Application` クラスを次のように更新して、React Native を適切に初期化する必要があります。
- Java
- Kotlin
package <your-package-here>;

import android.app.Application;
+import com.facebook.react.PackageList;
+import com.facebook.react.ReactApplication;
+import com.facebook.react.ReactHost;
+import com.facebook.react.ReactNativeHost;
+import com.facebook.react.ReactPackage;
+import com.facebook.react.defaults.DefaultNewArchitectureEntryPoint;
+import com.facebook.react.defaults.DefaultReactHost;
+import com.facebook.react.defaults.DefaultReactNativeHost;
+import com.facebook.soloader.SoLoader;
+import com.facebook.react.soloader.OpenSourceMergedSoMapping
+import java.util.List;

-class MainApplication extends Application {
+class MainApplication extends Application implements ReactApplication {
+ @Override
+ public ReactNativeHost getReactNativeHost() {
+   return new DefaultReactNativeHost(this) {
+     @Override
+     protected List<ReactPackage> getPackages() { return new PackageList(this).getPackages(); }
+     @Override
+     protected String getJSMainModuleName() { return "index"; }
+     @Override
+     public boolean getUseDeveloperSupport() { return BuildConfig.DEBUG; }
+     @Override
+     protected boolean isNewArchEnabled() { return BuildConfig.IS_NEW_ARCHITECTURE_ENABLED; }
+     @Override
+     protected Boolean isHermesEnabled() { return BuildConfig.IS_HERMES_ENABLED; }
+   };
+ }

+ @Override
+ public ReactHost getReactHost() {
+   return DefaultReactHost.getDefaultReactHost(getApplicationContext(), getReactNativeHost());
+ }

  @Override
  public void onCreate() {
    super.onCreate();
+   SoLoader.init(this, OpenSourceMergedSoMapping);
+   if (BuildConfig.IS_NEW_ARCHITECTURE_ENABLED) {
+     DefaultNewArchitectureEntryPoint.load();
+   }
  }
}
// package <your-package-here>

import android.app.Application
+import com.facebook.react.PackageList
+import com.facebook.react.ReactApplication
+import com.facebook.react.ReactHost
+import com.facebook.react.ReactNativeHost
+import com.facebook.react.ReactPackage
+import com.facebook.react.defaults.DefaultNewArchitectureEntryPoint.load
+import com.facebook.react.defaults.DefaultReactHost.getDefaultReactHost
+import com.facebook.react.defaults.DefaultReactNativeHost
+import com.facebook.soloader.SoLoader
+import com.facebook.react.soloader.OpenSourceMergedSoMapping

-class MainApplication : Application() {
+class MainApplication : Application(), ReactApplication {

+ override val reactNativeHost: ReactNativeHost =
+      object : DefaultReactNativeHost(this) {
+        override fun getPackages(): List<ReactPackage> = PackageList(this).packages
+        override fun getJSMainModuleName(): String = "index"
+        override fun getUseDeveloperSupport(): Boolean = BuildConfig.DEBUG
+        override val isNewArchEnabled: Boolean = BuildConfig.IS_NEW_ARCHITECTURE_ENABLED
+        override val isHermesEnabled: Boolean = BuildConfig.IS_HERMES_ENABLED
+      }

+ override val reactHost: ReactHost
+   get() = getDefaultReactHost(applicationContext, reactNativeHost)

  override fun onCreate() {
    super.onCreate()
+   SoLoader.init(this, OpenSourceMergedSoMapping)
+   if (BuildConfig.IS_NEW_ARCHITECTURE_ENABLED) {
+     load()
+   }
  }
}
いつものように、`MainApplication.kt` コミュニティテンプレートファイルを参照として使用してください。
ReactActivity の作成
最後に、`ReactActivity` を拡張し、React Native コードをホストする新しい `Activity` を作成する必要があります。この Activity は、React Native ランタイムを起動し、React コンポーネントをレンダリングする役割を担います。
- Java
- Kotlin
// package <your-package-here>;

import com.facebook.react.ReactActivity;
import com.facebook.react.ReactActivityDelegate;
import com.facebook.react.defaults.DefaultNewArchitectureEntryPoint;
import com.facebook.react.defaults.DefaultReactActivityDelegate;

public class MyReactActivity extends ReactActivity {

    @Override
    protected String getMainComponentName() {
        return "HelloWorld";
    }

    @Override
    protected ReactActivityDelegate createReactActivityDelegate() {
        return new DefaultReactActivityDelegate(this, getMainComponentName(), DefaultNewArchitectureEntryPoint.getFabricEnabled());
    }
}
// package <your-package-here>

import com.facebook.react.ReactActivity
import com.facebook.react.ReactActivityDelegate
import com.facebook.react.defaults.DefaultNewArchitectureEntryPoint.fabricEnabled
import com.facebook.react.defaults.DefaultReactActivityDelegate

class MyReactActivity : ReactActivity() {

    override fun getMainComponentName(): String = "HelloWorld"

    override fun createReactActivityDelegate(): ReactActivityDelegate =
        DefaultReactActivityDelegate(this, mainComponentName, fabricEnabled)
}
いつものように、`MainActivity.kt` コミュニティテンプレートファイルを参照として使用してください。
新しい Activity を作成するたびに、`AndroidManifest.xml` ファイルに追加する必要があります。また、`MyReactActivity` のテーマを `Theme.AppCompat.Light.NoActionBar` (または ActionBar のないテーマ) に設定する必要があります。そうしないと、アプリケーションが React Native 画面の上に ActionBar をレンダリングしてしまいます。
<manifest xmlns:android="http://schemas.android.com/apk/res/android">

    <uses-permission android:name="android.permission.INTERNET" />

    <application
      android:name=".MainApplication">

+     <activity
+       android:name=".MyReactActivity"
+       android:label="@string/app_name"
+       android:theme="@style/Theme.AppCompat.Light.NoActionBar">
+     </activity>
    </application>
</manifest>
これで、アクティビティは JavaScript コードを実行する準備ができました。
6. 統合のテスト
React Native をアプリケーションと統合するためのすべての基本手順を完了しました。次に、Metro bundler を起動して、TypeScript アプリケーションコードをバンドルにビルドします。Metro の HTTP サーバーは、開発環境の `localhost` からシミュレーターまたはデバイスにバンドルを共有します。これにより、ホットリロードが可能になります。
まず、次のようにプロジェクトのルートに `metro.config.js` ファイルを作成する必要があります。
const {getDefaultConfig} = require('@react-native/metro-config');
module.exports = getDefaultConfig(__dirname);
参照として、コミュニティテンプレートファイルから`metro.config.js` ファイルを確認できます。
設定ファイルが整ったら、バンドラーを実行できます。プロジェクトのルートディレクトリで次のコマンドを実行します。
- npm
- Yarn
npm start
yarn start
次に、通常通り Android アプリをビルドして実行します。
アプリ内で React を使用したアクティビティに到達すると、開発サーバーから JavaScript コードがロードされ、表示されるはずです。

Android Studio でリリースビルドを作成する
Android Studio を使用してリリースビルドを作成することもできます!以前の既存のネイティブ Android アプリのリリースビルドを作成するのと同じくらい迅速です。
React Native Gradle Plugin が、JS コードを APK/App Bundle にバンドルする処理を行います。
Android Studio を使用していない場合、次のようにしてリリースビルドを作成できます。
cd android
# For a Release APK
./gradlew :app:assembleRelease
# For a Release AAB
./gradlew :app:bundleRelease
次は何を?
この時点から、通常通りアプリの開発を続けることができます。React Native の使用方法の詳細については、デバッグおよびデプロイのドキュメントを参照してください。
主要な概念
React Native コンポーネントを iOS アプリケーションに統合するための鍵は、次のとおりです。
- 正しいディレクトリ構造を設定する。
- 必要な NPM 依存関係をインストールする。
- Podfile 設定に React Native を追加する。
- 最初の React Native 画面の TypeScript コードを記述する。
- `RCTRootView` を使用して React Native を iOS コードと統合する。
- バンドラーを実行し、アプリの動作を確認して統合をテストする。
コミュニティテンプレートの使用
このガイドに従う間、React Native Community Template を参考にすることをお勧めします。このテンプレートには最小限の iOS アプリが含まれており、既存の iOS アプリに React Native を統合する方法を理解するのに役立ちます。
前提条件
開発環境のセットアップとフレームワークなしで React Native を使用するガイドに従って、iOS 用の React Native アプリをビルドするための開発環境を設定してください。このガイドでは、`UIViewController` の作成や `Podfile` ファイルの編集など、iOS 開発の基本に精通していることを前提としています。
1. ディレクトリ構造の設定
スムーズな体験を確実にするために、統合された React Native プロジェクト用に新しいフォルダーを作成し、既存の iOS プロジェクトを `/ios` サブフォルダーに移動してください。
2. NPM 依存関係のインストール
ルートディレクトリに移動し、次のコマンドを実行します
curl -O https://raw.githubusercontent.com/react-native-community/template/refs/heads/0.82-stable/template/package.json
これにより、コミュニティテンプレートの `package.json` ファイルがプロジェクトにコピーされます。
次に、次のコマンドを実行して NPM パッケージをインストールします。
- npm
- Yarn
npm install
yarn install
インストールプロセスにより、新しい `node_modules` フォルダーが作成されました。このフォルダーには、プロジェクトのビルドに必要なすべての JavaScript 依存関係が保存されます。
`.gitignore` ファイルに `node_modules/` を追加します(コミュニティのデフォルトはこちら)。
3. 開発ツールのインストール
Xcode のコマンドラインツール
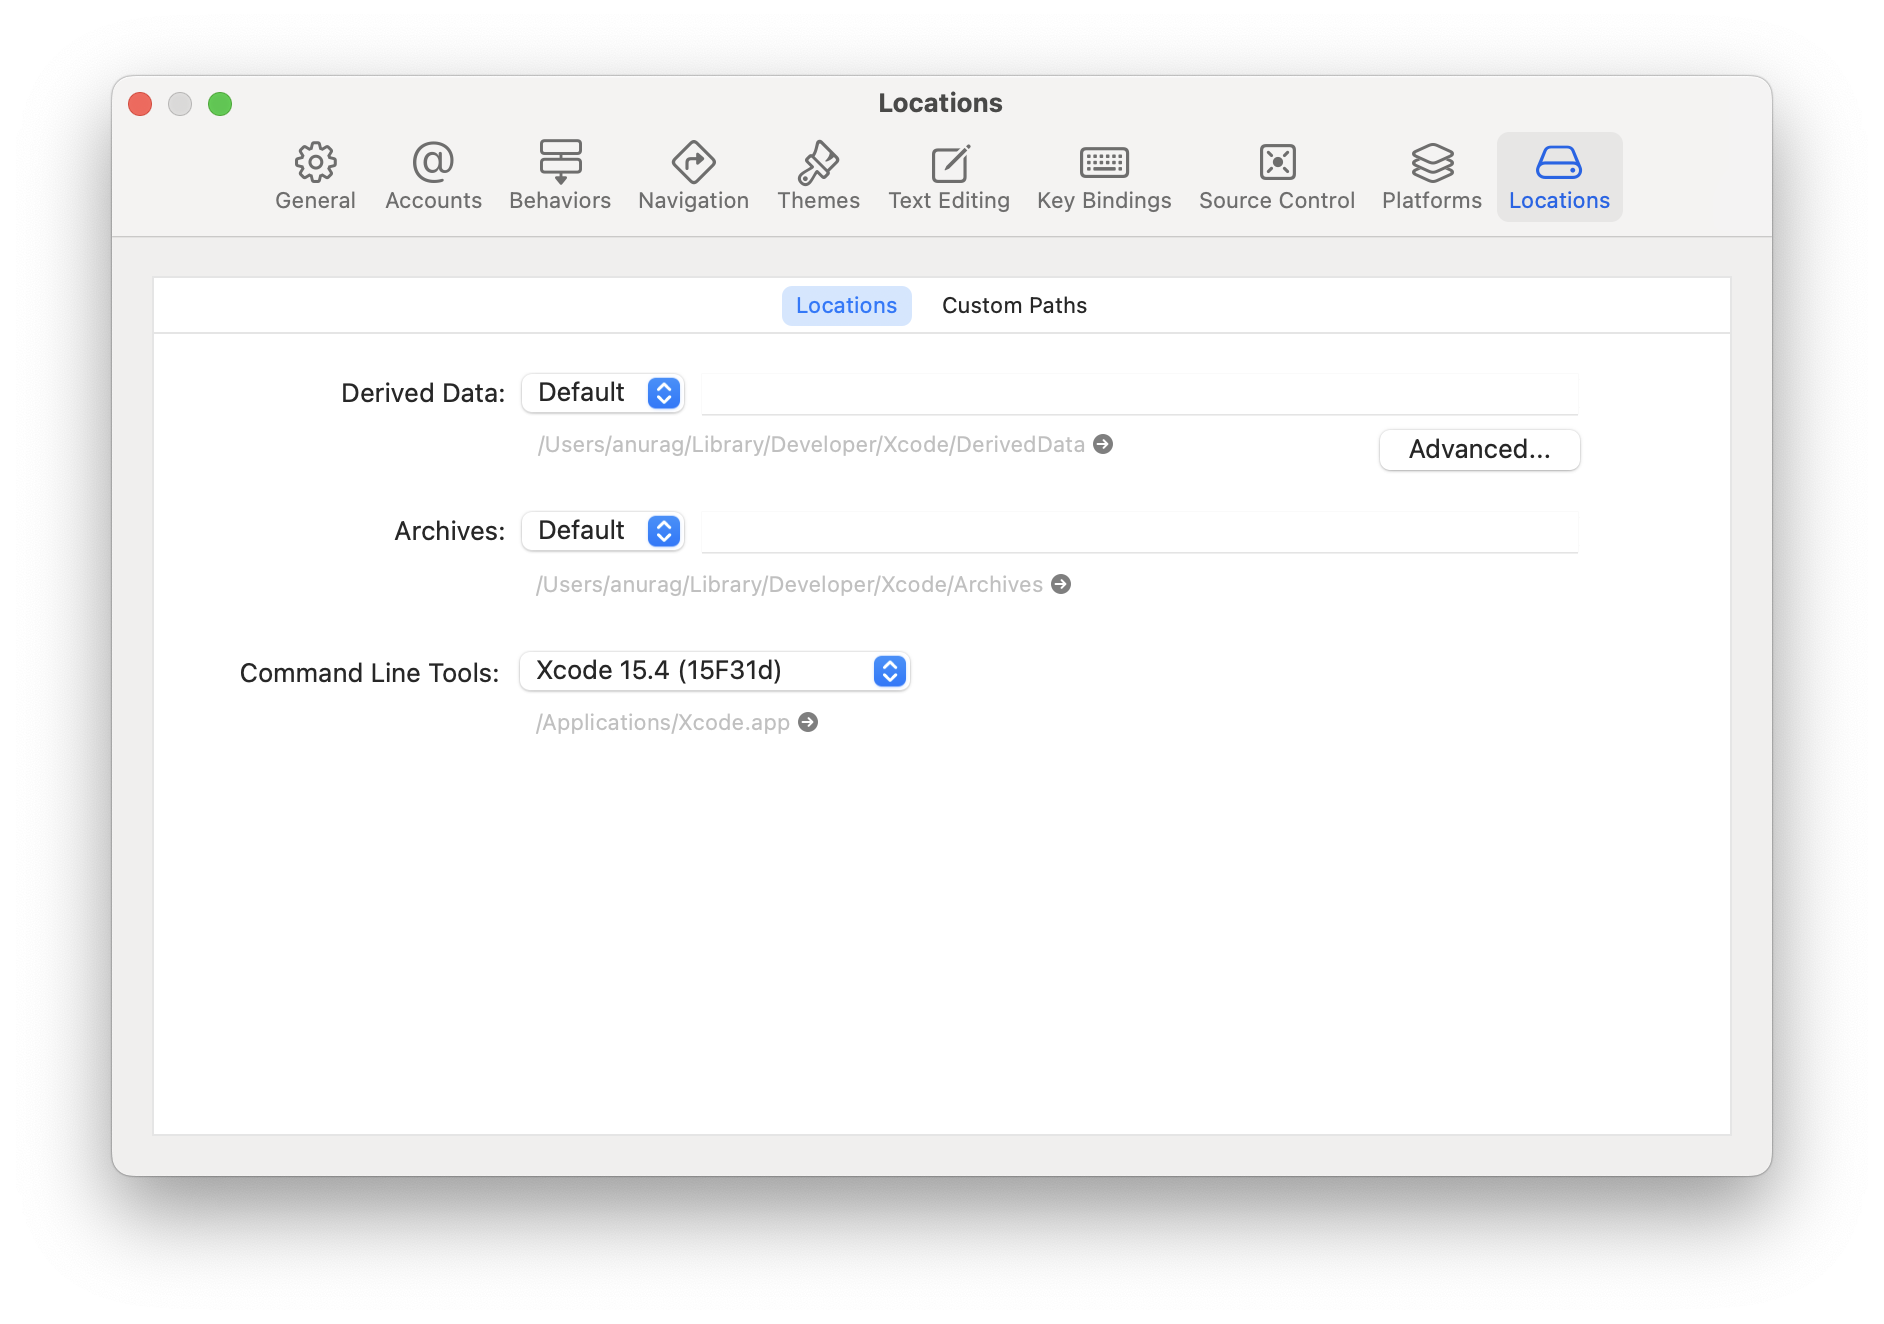
コマンドラインツールをインストールします。Xcode メニューで設定... (または環境設定...) を選択します。場所パネルに移動し、コマンドラインツールのドロップダウンで最新バージョンを選択してツールをインストールします。

CocoaPods
CocoaPods は、iOS および macOS 開発用のパッケージ管理ツールです。実際の React Native フレームワークコードを現在のプロジェクトにローカルに追加するために使用します。
CocoaPods は Homebrew を使用してインストールすることをお勧めします。
brew install cocoapods
4. アプリへの React Native の追加
CocoaPods の設定
CocoaPods を設定するには、2 つのファイルが必要です。
- 必要な Ruby 依存関係を定義する Gemfile。
- 依存関係を適切にインストールする方法を定義する Podfile。
Gemfileについては、プロジェクトのルートディレクトリに移動し、このコマンドを実行します。
curl -O https://raw.githubusercontent.com/react-native-community/template/refs/heads/0.82-stable/template/Gemfile
これにより、テンプレートから Gemfile がダウンロードされます。
Xcode 16 でプロジェクトを作成した場合は、次のように Gemfile を更新する必要があります。
-gem 'cocoapods', '>= 1.13', '!= 1.15.0', '!= 1.15.1'
+gem 'cocoapods', '1.16.2'
gem 'activesupport', '>= 6.1.7.5', '!= 7.1.0'
-gem 'xcodeproj', '< 1.26.0'
+gem 'xcodeproj', '1.27.0'
Xcode 16 は、以前のバージョンの Xcode とはわずかに異なる方法でプロジェクトを生成するため、適切に機能させるには最新の CocoaPods および Xcodeproj ジェムが必要です。
同様に、Podfile については、プロジェクトの `ios` フォルダーに移動して実行します。
curl -O https://raw.githubusercontent.com/react-native-community/template/refs/heads/0.82-stable/template/ios/Podfile
Gemfile と Podfile の参照点として、コミュニティテンプレートを使用してください。
この行を変更することを忘れないでください。
次に、Ruby gems と Pods をインストールするために、いくつかの追加コマンドを実行する必要があります。`ios` フォルダーに移動し、次のコマンドを実行します。
bundle install
bundle exec pod install
最初のコマンドは Ruby の依存関係をインストールし、2 番目のコマンドは実際に React Native コードをアプリケーションに統合するため、iOS ファイルが React Native ヘッダーをインポートできるようになります。
5. TypeScript コードの記述
次に、React Native を統合するためにネイティブ iOS アプリケーションを実際に変更します。
最初に書くコードは、アプリケーションに統合される新しい画面のための実際の React Native コードです。
`index.js` ファイルを作成する
まず、React Native プロジェクトのルートに空の `index.js` ファイルを作成します。
`index.js` は React Native アプリケーションのエントリポイントであり、常に必要です。これは、React Native コンポーネントまたはアプリケーションの一部である他のファイルを `import` する小さなファイルでも、それらに必要なすべてのコードを含むファイルでも構いません。
`index.js` は次のようになるはずです(参照としてコミュニティテンプレートファイルはこちら)。
import {AppRegistry} from 'react-native';
import App from './App';

AppRegistry.registerComponent('HelloWorld', () => App);
`App.tsx` ファイルを作成する
`App.tsx` ファイルを作成しましょう。これは、TypeScript ファイルであり、JSX 式を持つことができます。iOS アプリケーションに統合するルート React Native コンポーネントを含んでいます (リンク)。
import React from 'react';
import {
  SafeAreaView,
  ScrollView,
  StatusBar,
  StyleSheet,
  Text,
  useColorScheme,
  View,
} from 'react-native';

import {
  Colors,
  DebugInstructions,
  Header,
  ReloadInstructions,
} from 'react-native/Libraries/NewAppScreen';

function App(): React.JSX.Element {
  const isDarkMode = useColorScheme() === 'dark';

  const backgroundStyle = {
    backgroundColor: isDarkMode ? Colors.darker : Colors.lighter,
  };

  return (
    <SafeAreaView style={backgroundStyle}>
      <StatusBar
        barStyle={isDarkMode ? 'light-content' : 'dark-content'}
        backgroundColor={backgroundStyle.backgroundColor}
      />
      <ScrollView
        contentInsetAdjustmentBehavior="automatic"
        style={backgroundStyle}>
        <Header />
        <View
          style={{
            backgroundColor: isDarkMode
              ? Colors.black
              : Colors.white,
            padding: 24,
          }}>
          <Text style={styles.title}>Step One</Text>
          <Text>
            Edit <Text style={styles.bold}>App.tsx</Text> to
            change this screen and see your edits.
          </Text>
          <Text style={styles.title}>See your changes</Text>
          <ReloadInstructions />
          <Text style={styles.title}>Debug</Text>
          <DebugInstructions />
        </View>
      </ScrollView>
    </SafeAreaView>
  );
}

const styles = StyleSheet.create({
  title: {
    fontSize: 24,
    fontWeight: '600',
  },
  bold: {
    fontWeight: '700',
  },
});

export default App;
参照としてコミュニティテンプレートファイルはこちらです。
5. iOS コードとの統合
React Native ランタイムを起動し、React コンポーネントをレンダリングするように指示するために、いくつかのネイティブコードを追加する必要があります。
要件
React Native の初期化は、iOS アプリの特定のパーツに紐付けられなくなりました。
React Native は `RCTReactNativeFactory` というクラスを使用して初期化でき、このクラスが React Native のライフサイクルを管理します。
クラスが初期化されると、`UIWindow` オブジェクトを提供して React Native ビューを開始するか、ファクトリーに任意の `UIViewController` にロードできる `UIView` を生成するように要求できます。
以下の例では、React Native ビューを自身の `view` としてロードできる ViewController を作成します。
ReactViewController の作成
テンプレート (⌘+N) から新しいファイルを作成し、Cocoa Touch Class テンプレートを選択します。
「Subclass of」フィールドに `UIViewController` を選択していることを確認してください。
- ObjectiveC
- Swift
次に、`ReactViewController.m` ファイルを開き、次の変更を適用します。
#import "ReactViewController.h"
+#import <React/RCTBundleURLProvider.h>
+#import <RCTReactNativeFactory.h>
+#import <RCTDefaultReactNativeFactoryDelegate.h>
+#import <RCTAppDependencyProvider.h>


@interface ReactViewController ()

@end

+@interface ReactNativeFactoryDelegate: RCTDefaultReactNativeFactoryDelegate
+@end

-@implementation ReactViewController
+@implementation ReactViewController {
+  RCTReactNativeFactory *_factory;
+  id<RCTReactNativeFactoryDelegate> _factoryDelegate;
+}

 - (void)viewDidLoad {
     [super viewDidLoad];
     // Do any additional setup after loading the view.
+    _factoryDelegate = [ReactNativeFactoryDelegate new];
+    _factoryDelegate.dependencyProvider = [RCTAppDependencyProvider new];
+    _factory = [[RCTReactNativeFactory alloc] initWithDelegate:_factoryDelegate];
+    self.view = [_factory.rootViewFactory viewWithModuleName:@"HelloWorld"];
 }

@end

+@implementation ReactNativeFactoryDelegate
+
+- (NSURL *)sourceURLForBridge:(RCTBridge *)bridge
+{
+  return [self bundleURL];
+}
+
+- (NSURL *)bundleURL
+{
+#if DEBUG
+  return [RCTBundleURLProvider.sharedSettings jsBundleURLForBundleRoot:@"index"];
+#else
+  return [NSBundle.mainBundle URLForResource:@"main" withExtension:@"jsbundle"];
+#endif
+}

@end
次に、`ReactViewController.swift` ファイルを開き、次の変更を適用します。
import UIKit
+import React
+import React_RCTAppDelegate
+import ReactAppDependencyProvider

class ReactViewController: UIViewController {
+  var reactNativeFactory: RCTReactNativeFactory?
+  var reactNativeFactoryDelegate: RCTReactNativeFactoryDelegate?

  override func viewDidLoad() {
    super.viewDidLoad()
+    reactNativeFactoryDelegate = ReactNativeDelegate()
+    reactNativeFactoryDelegate!.dependencyProvider = RCTAppDependencyProvider()
+    reactNativeFactory = RCTReactNativeFactory(delegate: reactNativeFactoryDelegate!)
+    view = reactNativeFactory!.rootViewFactory.view(withModuleName: "HelloWorld")

  }
}

+class ReactNativeDelegate: RCTDefaultReactNativeFactoryDelegate {
+    override func sourceURL(for bridge: RCTBridge) -> URL? {
+      self.bundleURL()
+    }
+
+    override func bundleURL() -> URL? {
+      #if DEBUG
+      RCTBundleURLProvider.sharedSettings().jsBundleURL(forBundleRoot: "index")
+      #else
+      Bundle.main.url(forResource: "main", withExtension: "jsbundle")
+      #endif
+    }
+
+}
rootViewController で React Native ビューを表示する
最後に、React Native ビューを表示できます。そのためには、JS コンテンツをロードできるビューをホストする新しいビューコントローラが必要です。すでに初期の `ViewController` があり、それを使って `ReactViewController` を表示させることができます。これを行うには、アプリによっていくつかの方法があります。この例では、React Native をモーダルに表示するボタンがあると仮定します。
- ObjectiveC
- Swift
#import "ViewController.h"
+#import "ReactViewController.h"

@interface ViewController ()

@end

- @implementation ViewController
+@implementation ViewController {
+  ReactViewController *reactViewController;
+}

 - (void)viewDidLoad {
   [super viewDidLoad];
   // Do any additional setup after loading the view.
   self.view.backgroundColor = UIColor.systemBackgroundColor;
+  UIButton *button = [UIButton new];
+  [button setTitle:@"Open React Native" forState:UIControlStateNormal];
+  [button setTitleColor:UIColor.systemBlueColor forState:UIControlStateNormal];
+  [button setTitleColor:UIColor.blueColor forState:UIControlStateHighlighted];
+  [button addTarget:self action:@selector(presentReactNative) forControlEvents:UIControlEventTouchUpInside];
+  [self.view addSubview:button];

+  button.translatesAutoresizingMaskIntoConstraints = NO;
+  [NSLayoutConstraint activateConstraints:@[
+    [button.leadingAnchor constraintEqualToAnchor:self.view.leadingAnchor],
+    [button.trailingAnchor constraintEqualToAnchor:self.view.trailingAnchor],
+    [button.centerYAnchor constraintEqualToAnchor:self.view.centerYAnchor],
+    [button.centerXAnchor constraintEqualToAnchor:self.view.centerXAnchor],
+  ]];
 }

+- (void)presentReactNative
+{
+  if (reactViewController == NULL) {
+    reactViewController = [ReactViewController new];
+  }
+  [self presentViewController:reactViewController animated:YES];
+}

@end
import UIKit

class ViewController: UIViewController {

+  var reactViewController: ReactViewController?

  override func viewDidLoad() {
    super.viewDidLoad()
    // Do any additional setup after loading the view.
    self.view.backgroundColor = .systemBackground

+    let button = UIButton()
+    button.setTitle("Open React Native", for: .normal)
+    button.setTitleColor(.systemBlue, for: .normal)
+    button.setTitleColor(.blue, for: .highlighted)
+    button.addAction(UIAction { [weak self] _ in
+      guard let self else { return }
+      if reactViewController == nil {
+       reactViewController = ReactViewController()
+      }
+      present(reactViewController!, animated: true)
+    }, for: .touchUpInside)
+    self.view.addSubview(button)
+
+    button.translatesAutoresizingMaskIntoConstraints = false
+    NSLayoutConstraint.activate([
+      button.leadingAnchor.constraint(equalTo: self.view.leadingAnchor),
+      button.trailingAnchor.constraint(equalTo: self.view.trailingAnchor),
+      button.centerXAnchor.constraint(equalTo: self.view.centerXAnchor),
+      button.centerYAnchor.constraint(equalTo: self.view.centerYAnchor),
+    ])
  }
}
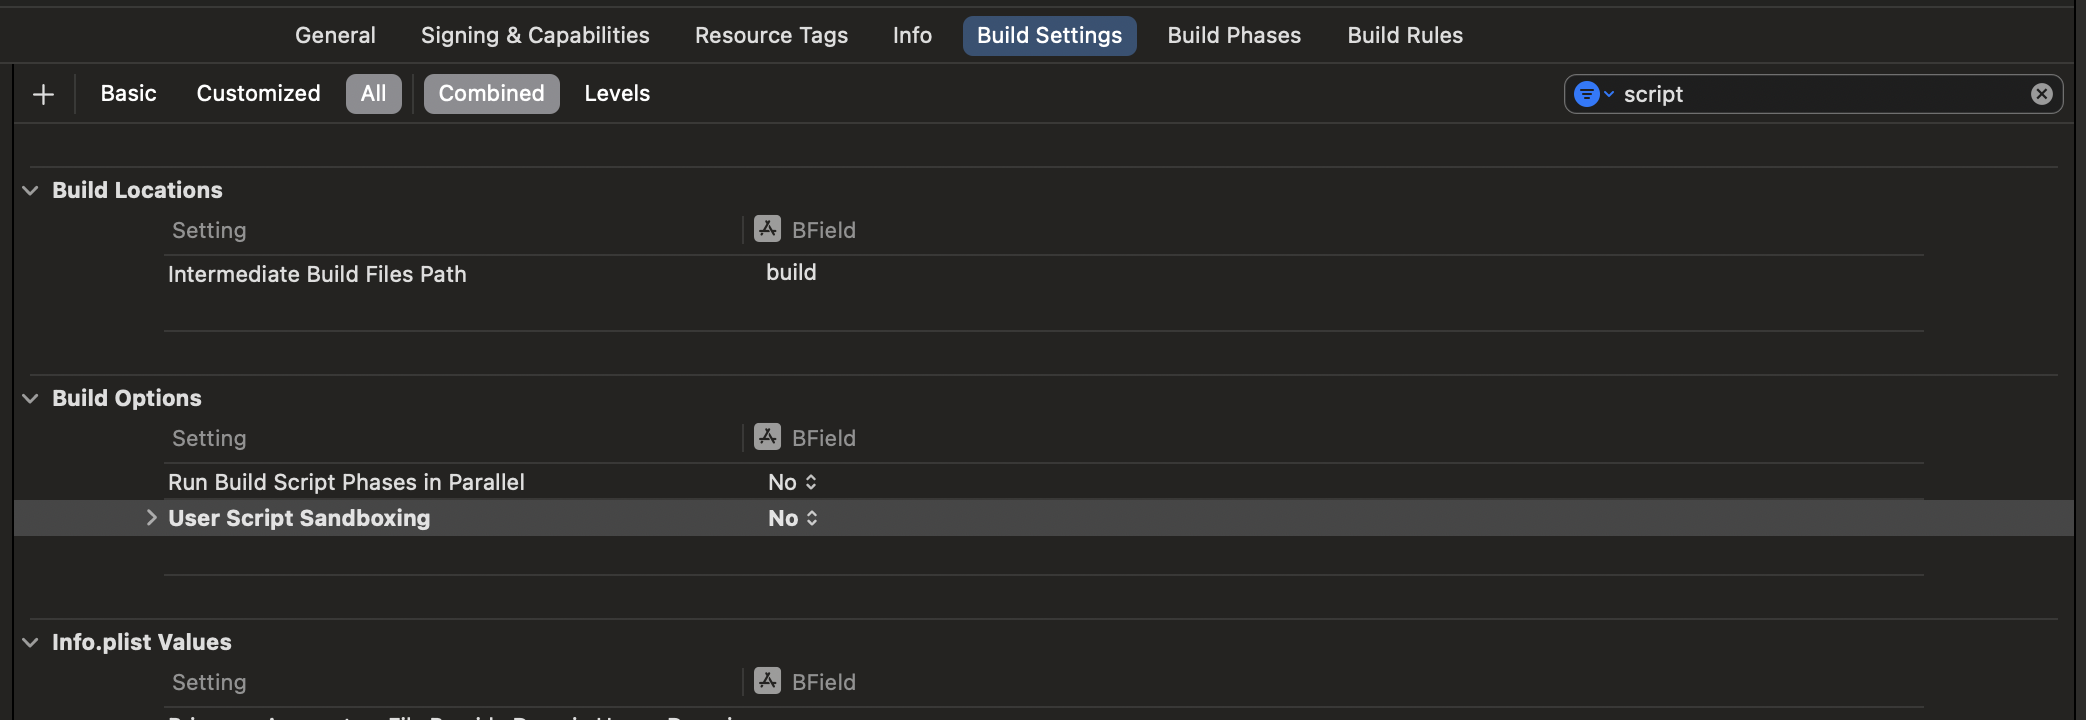
サンドボックススクリプトを無効にしてください。これを行うには、Xcode でアプリをクリックし、ビルド設定をクリックします。スクリプトでフィルタリングし、`User Script Sandboxing` を `NO` に設定します。このステップは、React Native に同梱されている Hermes エンジンのデバッグバージョンとリリースバージョンを適切に切り替えるために必要です。

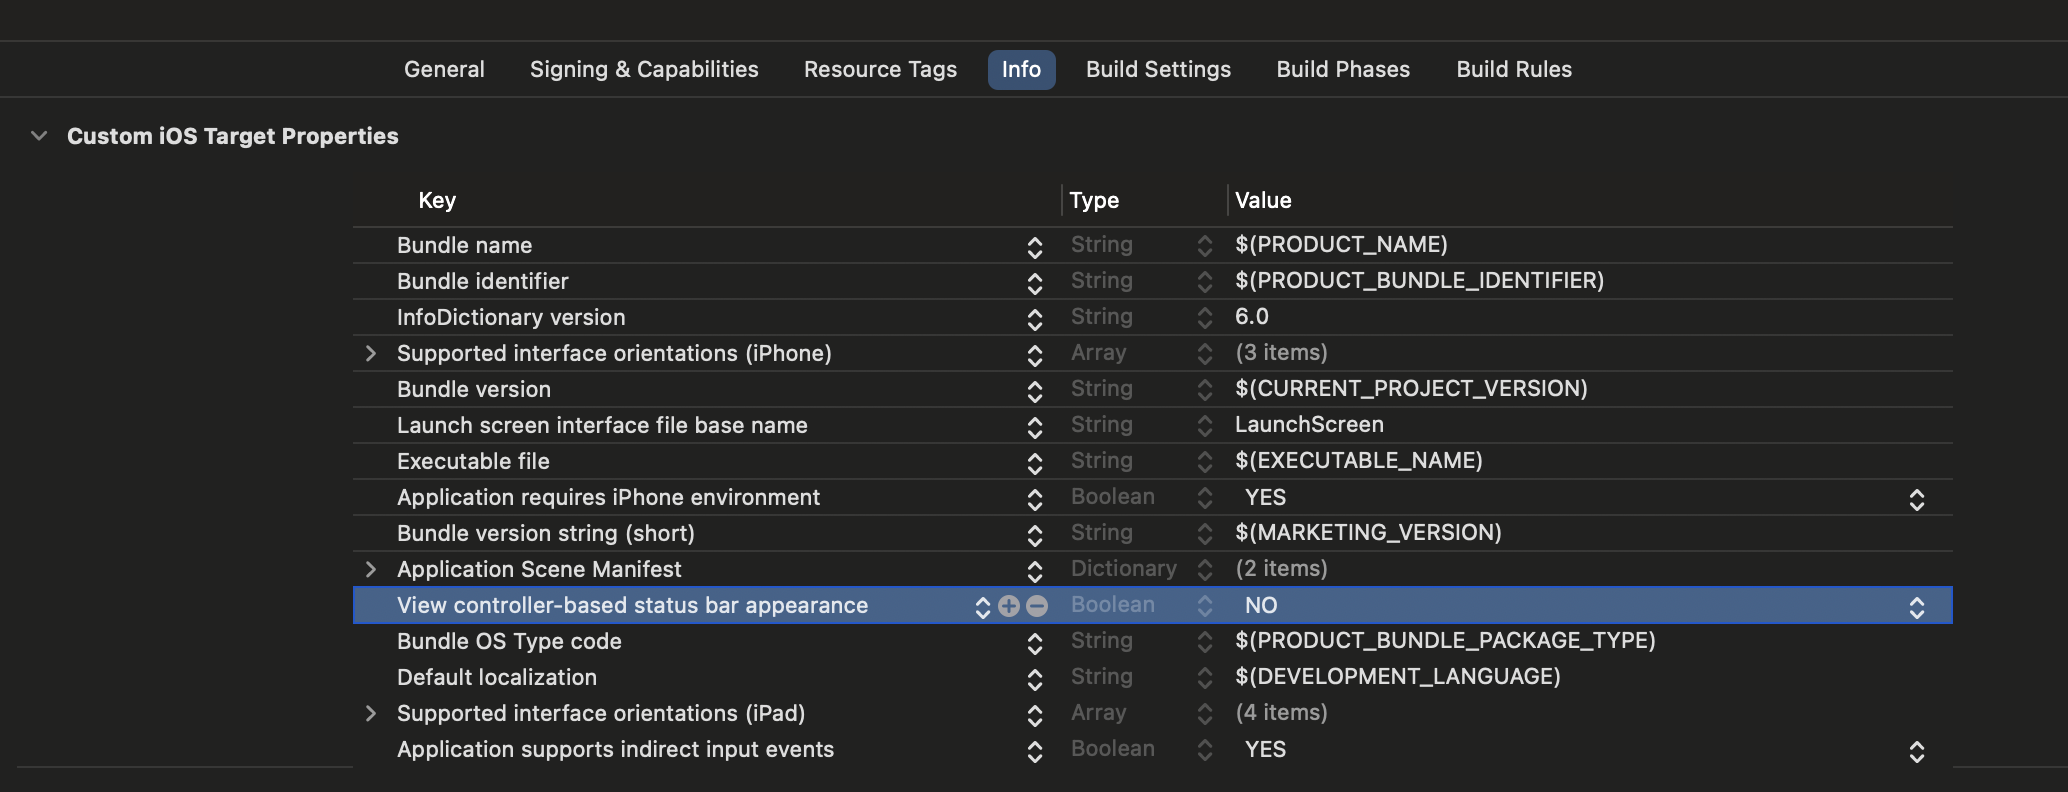
最後に、`Info.plist` ファイルに `UIViewControllerBasedStatusBarAppearance` キーを値 `NO` で追加してください。

6. 統合のテスト
React Native をアプリケーションと統合するためのすべての基本手順を完了しました。次に、Metro bundler を起動して、TypeScript アプリケーションコードをバンドルにビルドします。Metro の HTTP サーバーは、開発環境の `localhost` からシミュレーターまたはデバイスにバンドルを共有します。これにより、ホットリロードが可能になります。
まず、次のようにプロジェクトのルートに `metro.config.js` ファイルを作成する必要があります。
const {getDefaultConfig} = require('@react-native/metro-config');
module.exports = getDefaultConfig(__dirname);
参照として、コミュニティテンプレートファイルから`metro.config.js` ファイルを確認できます。
次に、プロジェクトのルートに `.watchmanconfig` ファイルを作成する必要があります。このファイルには空の JSON オブジェクトが含まれている必要があります。
echo {} > .watchmanconfig
設定ファイルが整ったら、バンドラーを実行できます。プロジェクトのルートディレクトリで次のコマンドを実行します。
- npm
- Yarn
npm start
yarn start
次に、通常通り iOS アプリをビルドして実行します。
アプリ内で React を使用したアクティビティに到達すると、開発サーバーから JavaScript コードがロードされ、表示されるはずです。

Xcode でリリースビルドを作成する
Xcode を使用してリリースビルドを作成することもできます!唯一の追加手順は、アプリがビルドされるときに実行されるスクリプトを追加して、JS コードと画像を iOS アプリケーションにパッケージ化することです。
- Xcode でアプリケーションを選択します。
- 「Build Phases」をクリックします。
- 左上の「+」をクリックし、「New Run Script Phase」を選択します。
- 「Run Script」の行をクリックし、スクリプトの名前を「Bundle React Native code and images」に変更します。
- テキストボックスに以下のスクリプトを貼り付けます。
set -e

WITH_ENVIRONMENT="$REACT_NATIVE_PATH/scripts/xcode/with-environment.sh"
REACT_NATIVE_XCODE="$REACT_NATIVE_PATH/scripts/react-native-xcode.sh"

/bin/sh -c "$WITH_ENVIRONMENT $REACT_NATIVE_XCODE"
- `[CP] Embed Pods Frameworks` というスクリプトの前にドラッグ&ドロップします。
これで、リリース用にアプリをビルドすると、期待通りに動作します。
7. React Native ビューへの初期プロパティの引き渡し
場合によっては、ネイティブアプリから JavaScript に情報を渡したいことがあります。例えば、現在ログインしているユーザーのユーザー ID と、データベースから情報を取得するために使用できるトークンを React Native に渡したい場合があります。
これは、`RCTReactNativeFactory` クラスの `view(withModuleName:initialProperty)` オーバーロードの `initialProperties` パラメータを使用することで可能です。以下の手順でその方法を示します。
初期プロパティを読み込むように App.tsx ファイルを更新する。
`App.tsx` ファイルを開き、次のコードを追加します。
import {
  Colors,
  DebugInstructions,
  Header,
  ReloadInstructions,
} from 'react-native/Libraries/NewAppScreen';

-function App(): React.JSX.Element {
+function App(props): React.JSX.Element {
  const isDarkMode = useColorScheme() === 'dark';

  const backgroundStyle = {
    backgroundColor: isDarkMode ? Colors.darker : Colors.lighter,
  };

  return (
    <SafeAreaView style={backgroundStyle}>
      <StatusBar
        barStyle={isDarkMode ? 'light-content' : 'dark-content'}
        backgroundColor={backgroundStyle.backgroundColor}
      />
      <ScrollView
        contentInsetAdjustmentBehavior="automatic"
        style={backgroundStyle}>
        <Header />
-       <View
-         style={{
-           backgroundColor: isDarkMode
-             ? Colors.black
-             : Colors.white,
-           padding: 24,
-         }}>
-         <Text style={styles.title}>Step One</Text>
-         <Text>
-           Edit <Text style={styles.bold}>App.tsx</Text> to
-           change this screen and see your edits.
-         </Text>
-         <Text style={styles.title}>See your changes</Text>
-         <ReloadInstructions />
-         <Text style={styles.title}>Debug</Text>
-         <DebugInstructions />
+         <Text style={styles.title}>UserID: {props.userID}</Text>
+         <Text style={styles.title}>Token: {props.token}</Text>
        </View>
      </ScrollView>
    </SafeAreaView>
  );
}

const styles = StyleSheet.create({
  title: {
    fontSize: 24,
    fontWeight: '600',
+   marginLeft: 20,
  },
  bold: {
    fontWeight: '700',
  },
});

export default App;
これらの変更により、React Native はあなたの App コンポーネントがいくつかのプロパティを受け入れることを認識します。`RCTreactNativeFactory` は、レンダリング時にそれらをコンポーネントに渡す役割を担います。
ネイティブコードを更新して、初期プロパティを JavaScript に渡す。
- ObjectiveC
- Swift
`ReactViewController.mm` を変更して、初期プロパティを JavaScript に渡します。
 - (void)viewDidLoad {
   [super viewDidLoad];
   // Do any additional setup after loading the view.

   _factoryDelegate = [ReactNativeFactoryDelegate new];
   _factoryDelegate.dependencyProvider = [RCTAppDependencyProvider new];
   _factory = [[RCTReactNativeFactory alloc] initWithDelegate:_factoryDelegate];
-  self.view = [_factory.rootViewFactory viewWithModuleName:@"HelloWorld"];
+  self.view = [_factory.rootViewFactory viewWithModuleName:@"HelloWorld" initialProperties:@{
+    @"userID": @"12345678",
+    @"token": @"secretToken"
+  }];
}
`ReactViewController.swift` を変更して、初期プロパティを React Native ビューに渡します。
  override func viewDidLoad() {
    super.viewDidLoad()
    reactNativeFactoryDelegate = ReactNativeDelegate()
    reactNativeFactoryDelegate!.dependencyProvider = RCTAppDependencyProvider()
    reactNativeFactory = RCTReactNativeFactory(delegate: reactNativeFactoryDelegate!)
-   view = reactNativeFactory!.rootViewFactory.view(withModuleName: "HelloWorld")
+   view = reactNativeFactory!.rootViewFactory.view(withModuleName: "HelloWorld" initialProperties: [
+     "userID": "12345678",
+     "token": "secretToken"
+])

  }
}
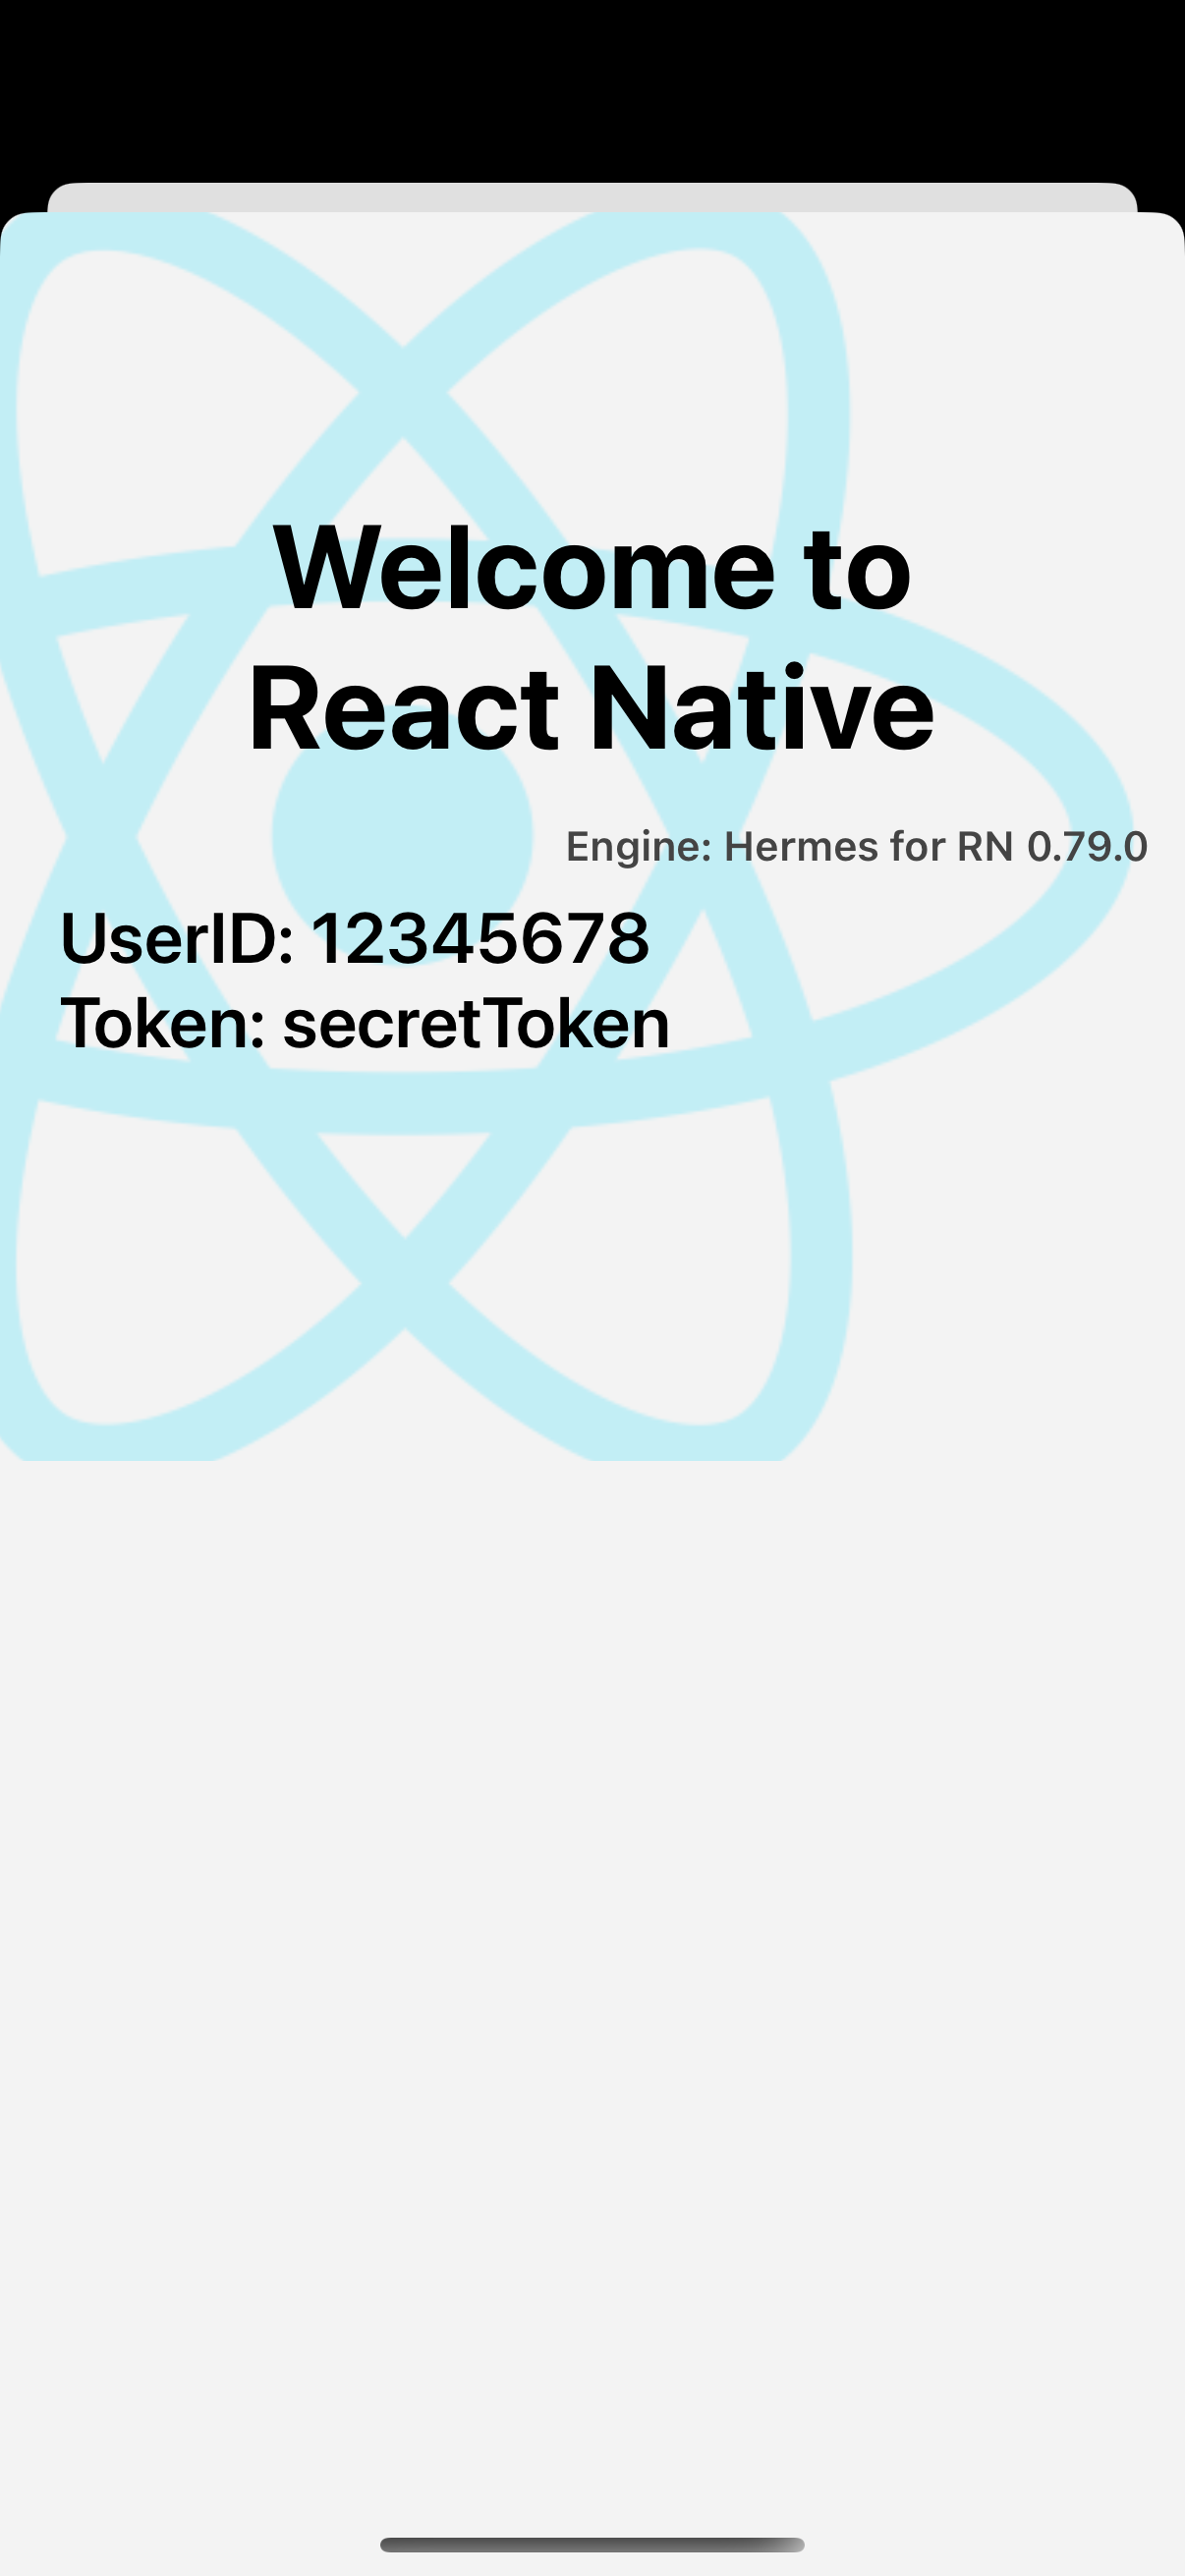
- もう一度アプリを実行してください。`ReactViewController` を表示した後、次の画面が表示されるはずです。

次は何を?
この時点から、通常通りアプリの開発を続けることができます。React Native の使用方法の詳細については、デバッグおよびデプロイのドキュメントを参照してください。