ネイティブコンポーネントでネイティブ関数を呼び出す
ベースガイドでは、新しいNative Componentを作成する方法、JS側からネイティブ側にプロパティを渡す方法、ネイティブ側からJSにイベントを送信する方法について説明しました。
カスタムコンポーネントは、ネイティブコードに実装された一部の関数を命令的に呼び出して、ウェブページのプログラムによる再読み込みなどのより高度な機能を実現することもできます。
このガイドでは、新しい概念であるNative Commandsを使用してこれを実現する方法を学びます。
このガイドはNative Componentsガイドから始まり、それに精通していること、およびCodegenに精通していることを前提としています。
1. コンポーネントのスペックを更新する
最初のステップは、NativeCommandを宣言するためにコンポーネントのスペックを更新することです。
- TypeScript
- Flow
WebViewNativeComponent.tsを以下のように更新します。
import type {HostComponent, ViewProps} from 'react-native';
import type {BubblingEventHandler} from 'react-native/Libraries/Types/CodegenTypes';
import codegenNativeComponent from 'react-native/Libraries/Utilities/codegenNativeComponent';
+import codegenNativeCommands from 'react-native/Libraries/Utilities/codegenNativeCommands';

type WebViewScriptLoadedEvent = {
  result: 'success' | 'error';
};

export interface NativeProps extends ViewProps {
  sourceURL?: string;
  onScriptLoaded?: BubblingEventHandler<WebViewScriptLoadedEvent> | null;
}

+interface NativeCommands {
+    reload: (viewRef: React.ElementRef<HostComponent<NativeProps>>) => void;
+}

+export const Commands: NativeCommands = codegenNativeCommands<NativeCommands>({
+    supportedCommands: ['reload'],
+});

export default codegenNativeComponent<NativeProps>(
  'CustomWebView',
) as HostComponent<NativeProps>;
WebViewNativeComponent.jsを以下のように更新します。
// @flow strict-local

import type {HostComponent, ViewProps} from 'react-native';
import type {BubblingEventHandler} from 'react-native/Libraries/Types/CodegenTypes';
import codegenNativeComponent from 'react-native/Libraries/Utilities/codegenNativeComponent';
+import codegenNativeCommands from 'react-native/Libraries/Utilities/codegenNativeCommands';

type WebViewScriptLoadedEvent = $ReadOnly<{|
  result: "success" | "error",
|}>;

type NativeProps = $ReadOnly<{|
  ...ViewProps,
  sourceURL?: string;
  onScriptLoaded?: BubblingEventHandler<WebViewScriptLoadedEvent>?;
|}>;

+interface NativeCommands {
+    reload: (viewRef: React.ElementRef<HostComponent<NativeProps>>) => void;
+}

+export const Commands: NativeCommands = codegenNativeCommands<NativeCommands>({
+    supportedCommands: ['reload'],
+});

export default (codegenNativeComponent<NativeProps>(
  'CustomWebView',
): HostComponent<NativeProps>);
これらの変更には以下が必要です。
codegenNativeCommands関数をreact-nativeからインポートします。これにより、codegenはNativeCommandsのコードを生成するように指示されます。- ネイティブで呼び出したいメソッドを含むインターフェースを定義します。すべてのNative Commandsは、最初のパラメータの型が
React.ElementRefである必要があります。 - サポートされているコマンドのリストを渡して、
codegenNativeCommandsの呼び出しの結果であるCommands変数をエクスポートします。
TypeScriptでは、React.ElementRefは非推奨です。正しい型は実際にはReact.ComponentRefです。しかし、Codegenのバグにより、ComponentRefを使用するとアプリがクラッシュします。修正はすでにありますが、それを適用するにはReact Nativeの新しいバージョンをリリースする必要があります。
2. 新しいコマンドを使用するようにAppコードを更新する
これで、アプリでコマンドを使用できます。
- TypeScript
- Flow
App.tsxファイルを開き、以下のように変更します。
import React from 'react';
-import {Alert, StyleSheet, View} from 'react-native';
-import WebView from '../specs/WebViewNativeComponent';
+import {Alert, StyleSheet, Pressable, Text, View} from 'react-native';
+import WebView, {Commands} from '../specs/WebViewNativeComponent';

function App(): React.JSX.Element {
+    const webViewRef = React.useRef<React.ElementRef<typeof View> | null>(null);
+
+    const refresh = () => {
+        if (webViewRef.current) {
+            Commands.reload(webViewRef.current);
+        }
+    };

  return (
    <View style={styles.container}>
      <WebView
+       ref={webViewRef}
        sourceURL="https://react.dokyumento.jp/"
        style={styles.webview}
        onScriptLoaded={() => {
          Alert.alert('Page Loaded');
        }}
      />
+      <View style={styles.tabbar}>
+        <Pressable onPress={refresh} style={styles.button}>
+            {({pressed}) => (
+                !pressed ? <Text style={styles.buttonText}>Refresh</Text> : <Text style={styles.buttonTextPressed}>Refresh</Text>) }
+        </Pressable>
+      </View>
    </View>
  );
}

const styles = StyleSheet.create({
  container: {
    flex: 1,
    alignItems: 'center',
    alignContent: 'center',
  },
  webview: {
    width: '100%',
-    height: '100%',
+    height: '90%',
  },
+  tabbar: {
+    flex: 1,
+    backgroundColor: 'gray',
+    width: '100%',
+    alignItems: 'center',
+    alignContent: 'center',
+  },
+  button: {
+    margin: 10,
+  },
+  buttonText: {
+    fontSize: 20,
+    fontWeight: 'bold',
+    color: '#00D6FF',
+    width: '100%',
+  },
+  buttonTextPressed: {
+    fontSize: 20,
+    fontWeight: 'bold',
+    color: '#00D6FF77',
+    width: '100%',
+  },
});

export default App;
ここでの関連する変更点は次のとおりです。
- スペックファイルから
Commands定数をインポートします。Commandは、ネイティブにあるメソッドを呼び出すことができるオブジェクトです。 useRefを使用してWebViewカスタムネイティブコンポーネントへの参照を宣言します。この参照をネイティブコマンドに渡す必要があります。refresh関数を実装します。この関数は、WebViewの参照がnullでないことを確認し、nullでない場合はコマンドを呼び出します。- ユーザーがボタンをタップしたときにコマンドを呼び出すためのPressableを追加します。
残りの変更は、Pressableを追加し、見栄えを良くするためにビューをスタイルするための通常のReactの変更です。
3. Codegenを再実行する
これでスペックが更新され、コードがコマンドを使用する準備が整いました。次はネイティブコードを実装する番です。しかし、ネイティブコードを書き始める前に、ネイティブコードで必要となる新しい型を生成するためにcodegenを再実行する必要があります。
- Android
- iOS
Codegenは `generateCodegenArtifactsFromSchema` Gradleタスクを通じて実行されます。
cd android
./gradlew generateCodegenArtifactsFromSchema

BUILD SUCCESSFUL in 837ms
14 actionable tasks: 3 executed, 11 up-to-date
これはAndroidアプリケーションをビルドする際に自動的に実行されます。
Codegenは、CocoaPodsによって生成されたプロジェクトに自動的に追加されるスクリプトフェーズの一部として実行されます。
cd ios
bundle install
bundle exec pod install
出力は次のようになります。
...
Framework build type is static library
[Codegen] Adding script_phases to ReactCodegen.
[Codegen] Generating ./build/generated/ios/ReactCodegen.podspec.json
[Codegen] Analyzing /Users/me/src/TurboModuleExample/package.json
[Codegen] Searching for codegen-enabled libraries in the app.
[Codegen] Found TurboModuleExample
[Codegen] Searching for codegen-enabled libraries in the project dependencies.
[Codegen] Found react-native
...
4. ネイティブコードを実装する
これで、JSがネイティブビューでメソッドを直接呼び出せるようにするネイティブ変更を実装する番です。
- Android
- iOS
ビューがNative Commandに応答できるようにするには、ReactWebViewManagerを変更するだけです。
今すぐビルドしようとすると、現在のReactWebViewManagerが新しいreloadメソッドを実装していないため、ビルドは失敗します。ビルドエラーを修正するには、ReactWebViewManagerを変更してそれを実装しましょう。
- Java
- Kotlin
//...
  @ReactProp(name = "sourceUrl")
  @Override
  public void setSourceURL(ReactWebView view, String sourceURL) {
    if (sourceURL == null) {
      view.emitOnScriptLoaded(ReactWebView.OnScriptLoadedEventResult.error);
      return;
    }
    view.loadUrl(sourceURL, new HashMap<>());
  }

+  @Override
+  public void reload(ReactWebView view) {
+    view.reload();
+  }

  public static final String REACT_CLASS = "CustomWebView";
//...
  @ReactProp(name = "sourceUrl")
  override fun setSourceURL(view: ReactWebView, sourceURL: String?) {
    if (sourceURL == null) {
      view.emitOnScriptLoaded(ReactWebView.OnScriptLoadedEventResult.error)
      return;
    }
    view.loadUrl(sourceURL, emptyMap())
  }

+  override fun reload(view: ReactWebView) {
+    view.reload()
+  }

  companion object {
    const val REACT_CLASS = "CustomWebView"
  }
この場合、ReactWebViewはAndroidのWebViewを継承しており、reloadメソッドが直接利用できるため、view.reload()メソッドを直接呼び出すだけで十分です。カスタムビューで利用できないカスタム関数を実装している場合は、React NativeのViewManagerによって管理されるAndroidのViewにも必要なメソッドを実装する必要があるかもしれません。
ビューがNative Commandに応答できるようにするには、iOSでいくつかのメソッドを実装する必要があります。
RCTWebView.mmファイルを開き、以下のように変更しましょう。
  // Event emitter convenience method
  - (const CustomWebViewEventEmitter &)eventEmitter
  {
  return static_cast<const CustomWebViewEventEmitter &>(*_eventEmitter);
  }

+  - (void)handleCommand:(const NSString *)commandName args:(const NSArray *)args
+  {
+  RCTCustomWebViewHandleCommand(self, commandName, args);
+  }
+
+  - (void)reload
+  {
+  [_webView reloadFromOrigin];
+  }

  + (ComponentDescriptorProvider)componentDescriptorProvider
  {
  return concreteComponentDescriptorProvider<CustomWebViewComponentDescriptor>();
  }
ビューがNative Commandsに応答できるようにするには、次の変更を適用する必要があります。
handleCommand:args関数を追加します。この関数は、コマンドを処理するためにコンポーネントのインフラストラクチャによって呼び出されます。関数の実装はすべてのコンポーネントで似ています。Codegenによって生成されるRCT関数を呼び出す必要があります。HandleCommand RCTは、呼び出す必要があるコマンドがサポートされているものの中にあるか、渡されたパラメータが期待されるものと一致するかなどを検証します。すべてのチェックが通過すると、HandleCommand RCTは適切なネイティブメソッドを呼び出します。HandleCommand reloadメソッドを実装します。この例では、reloadメソッドはWebKitのWebViewのreloadFromOrigin関数を呼び出します。
5. アプリを実行する
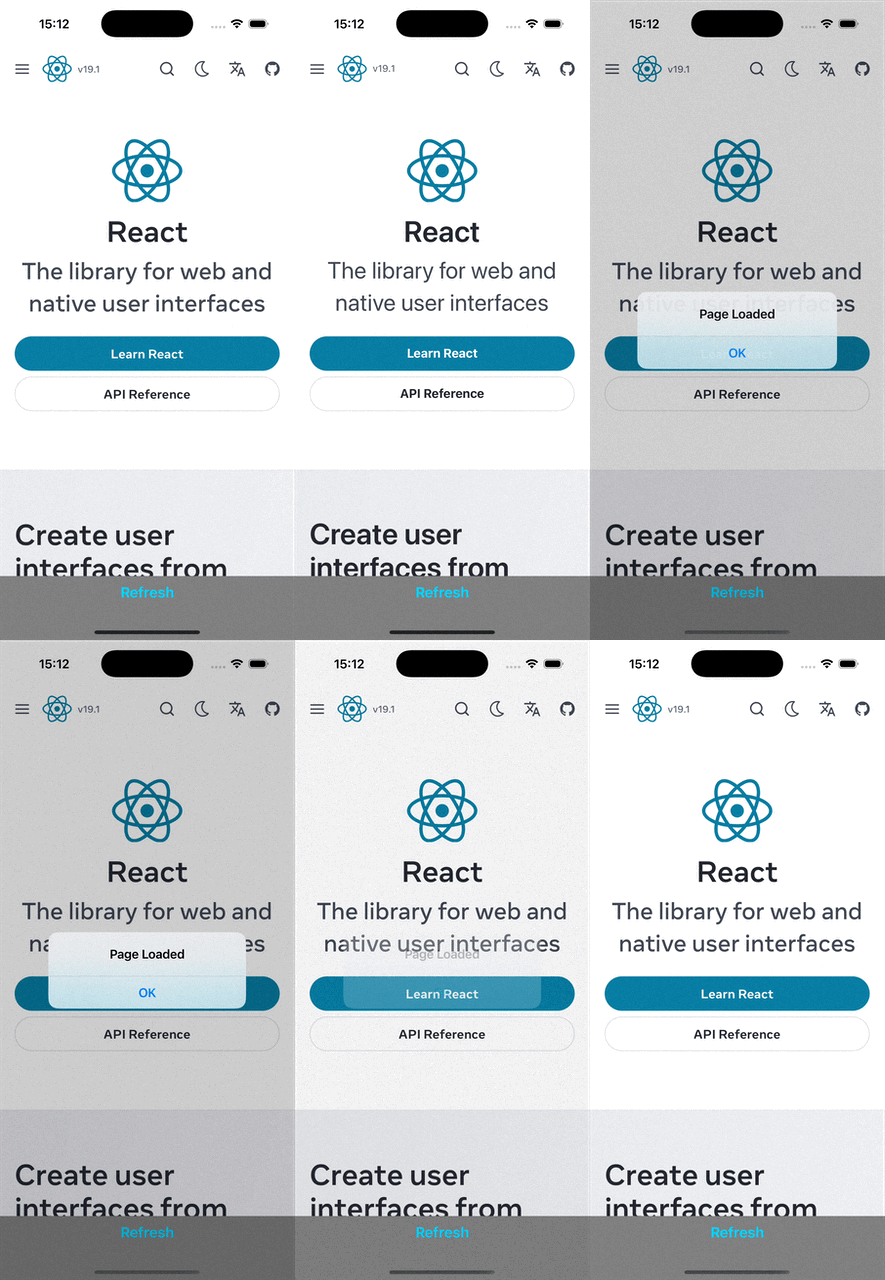
最後に、通常のコマンドでアプリを実行できます。アプリが実行されたら、更新ボタンをタップしてページが再読み込みされるのを確認できます。
 |  |